Open Source Hardware

PRINT IT YOURSELF

Everything you need to fabricate and assemble the StrikeToo attachment at your school — no engineering background required.

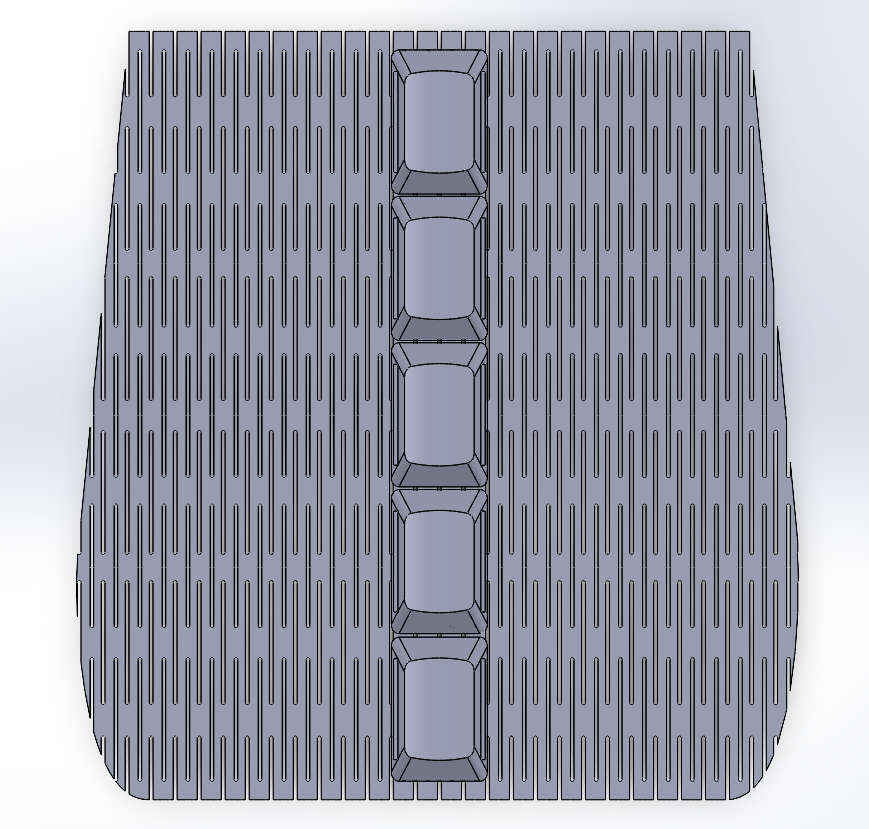
StrikeToo STL render — latest version

LATEST VERSION

The STL file below is the most current version of the StrikeToo PLA arm plate. It is designed to print with minimal supports using the orientation described in Step 2.

Total print cost is approximately $3.15 in PLA filament. Assembly takes under 5 minutes after the print completes.

Download STL
WHAT YOU NEED

FDM 3D Printer

Any standard FDM printer (e.g., Bambu Lab, Prusa, Ender). Build volume of at least 150 × 80 × 60 mm required.

Required

PLA Filament

Standard 1.75 mm PLA. Any brand works. Approximately 40–50 g per unit. No special properties needed.

Required

Industrial Velcro

Heavy-duty hook-and-loop strip, at least 1 inch wide. Available at any hardware store. Needed for both arm strap and racket attachment.

Required

Slicer Software

Bambu Studio, PrusaSlicer, or Ultimaker Cura. Free to download. Used to prepare the STL for printing.

Required

Scissors or Knife

For trimming Velcro strips to length and cutting neoprene padding to fit the shell interior.

Required

STEP-BY-STEP GUIDE

From download to play in under an hour.

01

Download & Open the STL

Click the Download STL button at the top of this page to get the latest file. Open your slicer software and import the STL by dragging it into the window or using File → Open.

The file is provided as a single-body STL. No assembly of parts is needed — it prints in one piece.
02

Set Print Orientation

Orientation is the most critical setting. Place the arm plate flat side down on the print bed — the open channel should face upward. This orientation keeps the Velcro slots clean and eliminates the need for internal supports.

03

Configure Slicer Settings

Use the settings below for the best balance of strength, flexibility, and print speed. These have been tested and validated for PLA on a standard FDM printer.

04

Print

Slice the model and send it to your printer. Estimated print time is 45–70 minutes depending on your printer and speed settings.

Let the bed cool fully before removing the part. Removing too early can warp the flat base.
05

Remove Brim & Clean Up

Peel away the brim from the base of the print. If printed in the correct orientation, no supports should need removal. Run your finger along the Velcro channels — they should be smooth and clear.

If you see any stringy artifacts inside the channel, a quick pass with a toothpick or small flat-head screwdriver will clear them out.
06

Thread & Attach Velcro

Cut two strips of industrial Velcro to length — one for the arm strap and one for securing the racket handle into the box-and-slot channel. Thread the strap through the printed loops and press the hook side firmly against the loop side to test the hold.

Use industrial-grade (not craft-grade) Velcro. The higher holding force is important for stability during active striking motions.
07

Insert Racket & Play

Slide the racket handle into the box-and-slot channel from the open end. Cinch the Velcro strap snugly around the handle. Strap the plate to the student's forearm and adjust until comfortable. The racket should feel like a stable extension of the arm — no grip required.

Done! Total assembly time from completed print to play-ready is under 5 minutes.

OPTIONAL: GRIP ATTACHMENT V2

For students who have some hand function, the grip attachment interfaces directly with the arm plate to provide additional control and feel.

Grip Attachment V2

ABOUT THIS ATTACHMENT

The Grip Attachment V2 is a separate, optional add-on that pairs with the StrikeToo arm plate. It is designed for students who can open their hand but cannot actively grip — the attachment holds the racket handle against the palm without requiring the student to squeeze.

It prints with the same settings as the arm plate and connects via the same Velcro interface, so no additional hardware is needed.

Download Grip Attachment STL